 Save
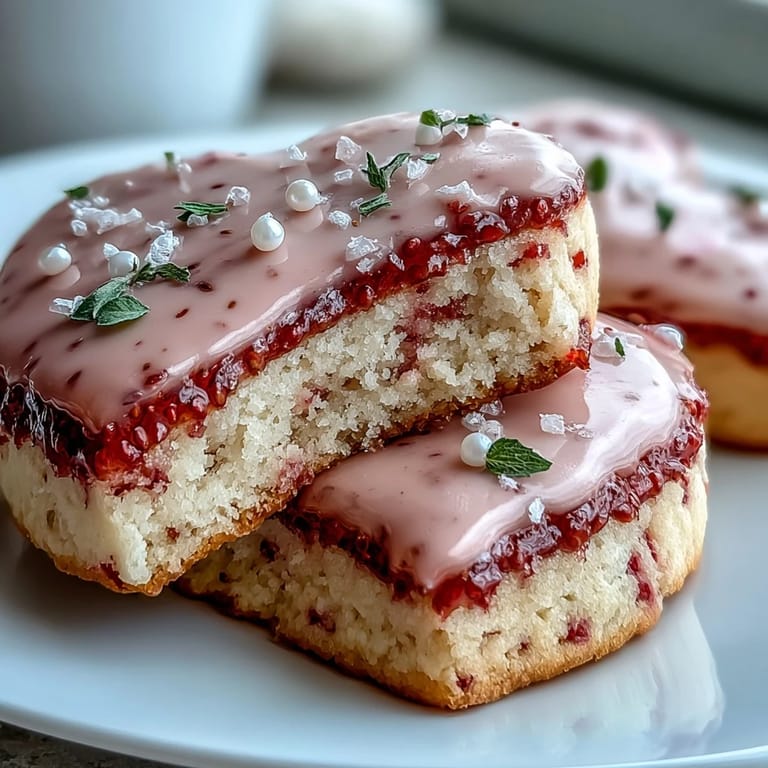
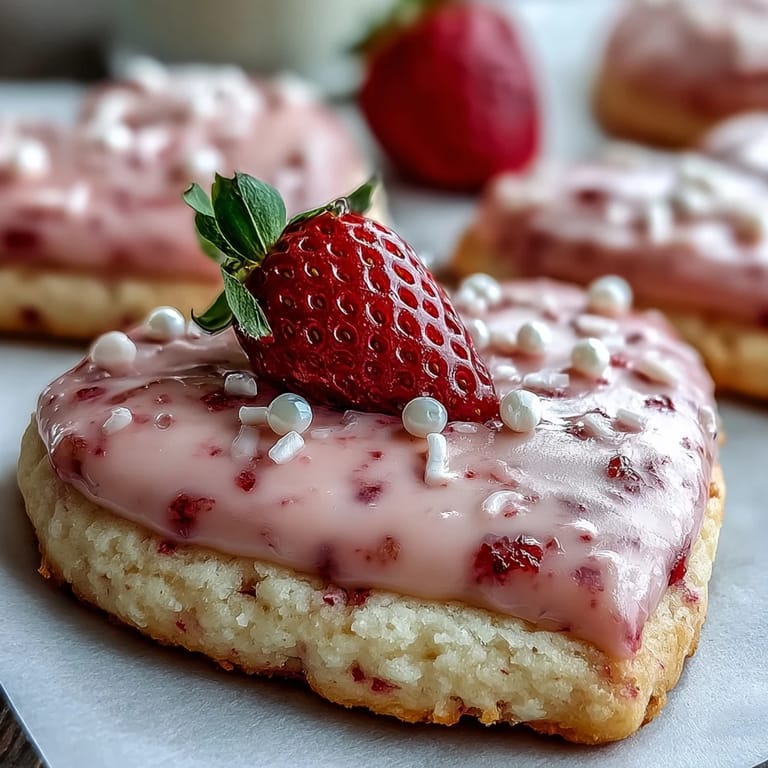
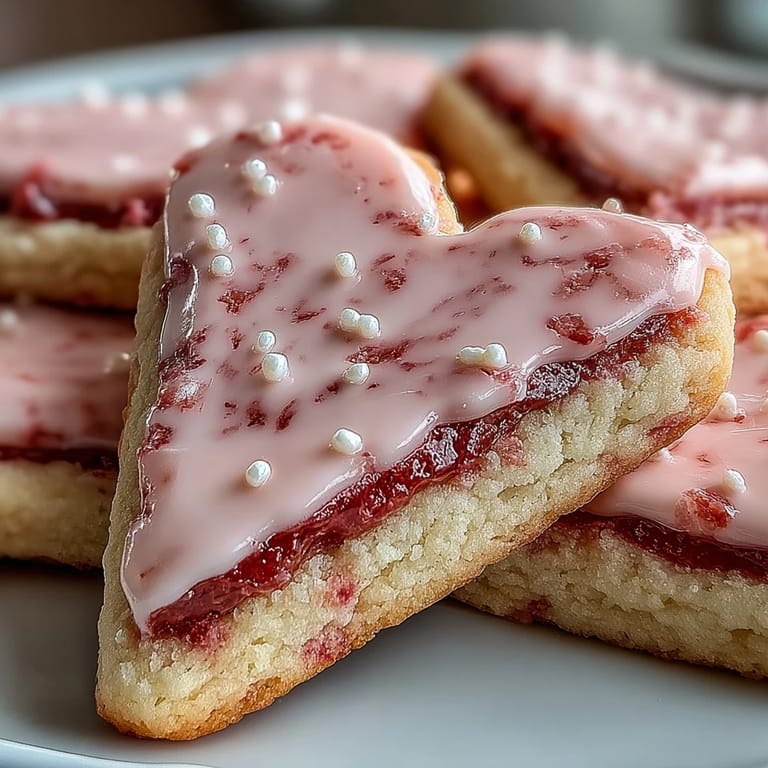
Save Last February, I found myself in the kitchen on a gray afternoon, thinking about how cookies could say things that words sometimes can't. My friend Sarah had mentioned offhand that strawberries reminded her of joy, and that stuck with me until I started experimenting with freeze-dried ones in sugar cookie dough. The first batch came out tender and delicate, with this subtle pink hue that felt almost romantic without trying too hard. When I piped the royal icing by hand, my lines were wobbly and imperfect, but somehow that made them feel more genuine. These cookies became my way of turning a simple ingredient into something that tasted like care.
I baked a double batch of these for my neighbor who'd been going through a rough patch, and the way her face lit up when she opened the box made me understand why people have been decorating cookies for centuries. There's something about the combination of that delicate strawberry flavor and the satisfying snap of royal icing that made those ordinary afternoon cookies feel like a small ceremony. She told me later that she'd saved one in a box just to look at it, which is probably the highest compliment a cookie can receive.
Ingredients
- All-purpose flour (2 ½ cups): This is your foundation, and measuring it properly by spooning into your cup rather than scooping directly from the bag makes a real difference in how tender your cookies turn out.
- Baking powder (½ tsp): Just enough to give the cookies a gentle lift without making them cakey or too puffy.
- Salt (¼ tsp): Salt does invisible work here, brightening the strawberry flavor and balancing the sweetness so the cookies don't cloy.
- Unsalted butter (¾ cup, softened): Softened butter creams better and creates that light, tender crumb you're after, so let it sit out for about 30 minutes before you start.
- Granulated sugar (1 cup): This sweetens the dough and creams with the butter to incorporate air, which gives the cookies their delicate structure.
- Large egg (room temperature): Room temperature eggs bind more smoothly into the creamed butter and sugar, creating a more cohesive dough.
- Pure vanilla extract (1 tsp): This adds depth and rounds out the strawberry flavor in a way that feels intentional rather than cloying.
- Almond extract (½ tsp, optional): If you use it, almond extract whispers in the background and makes the strawberry taste even more vibrant—I recommend it.
- Freeze-dried strawberries (¼ cup, finely ground): These are the soul of the recipe, and grinding them fine ensures the flavor distributes evenly without creating tough spots in your dough.
- Milk (1–2 tbsp, as needed): Add this gradually only if your dough seems dry, because humidity affects flour differently depending on where you live and what season it is.
- Powdered sugar (3 cups, sifted): Sifting removes lumps and creates that smooth, glossy icing that's almost glass-like when it sets.
- Egg whites (2 large): These create the structure of your royal icing, though meringue powder is safer if you're concerned about raw eggs.
- Lemon juice (½ tsp): This brightens the icing and prevents it from tasting overly sweet and one-dimensional.
- Vanilla extract (½ tsp): A touch of vanilla in the icing echoes the flavor in the cookies themselves, creating harmony.
- Gel food coloring (optional): Gel colorings don't thin out your icing like liquid colors do, so you get vivid color without adjusting your consistency.
Tired of Takeout? 🥡
Get 10 meals you can make faster than delivery arrives. Seriously.
One email. No spam. Unsubscribe anytime.
Instructions
- Combine your dry ingredients:
- Whisk together your flour, baking powder, salt, and ground freeze-dried strawberries in a medium bowl so everything is evenly distributed. This step prevents you from ending up with pockets of baking powder that create weird bitter spots in your cookies.
- Cream the butter and sugar:
- In a large bowl, beat the softened butter and granulated sugar together for about 2 to 3 minutes until the mixture is pale and fluffy, which means you've incorporated enough air to create a tender crumb. You'll notice the mixture goes from looking grainy to almost cloud-like, and that's exactly what you want.
- Add your wet ingredients:
- Mix in the egg, vanilla, and almond extract (if using) until everything is combined and the mixture is smooth. Don't overmix at this point, because you're just trying to bring everything together, not develop gluten.
- Bring the dough together:
- Gradually add the dry ingredients to the wet ingredients, mixing gently and just until incorporated, then add milk a tablespoon at a time only if the dough seems dry. The dough should come together without being sticky or crumbly, almost like soft play-dough that holds together when you squeeze it.
- Chill your dough:
- Divide the dough in half, flatten each piece into a disc, wrap in plastic, and chill for at least 1 hour (or overnight if you're planning ahead). Cold dough is less likely to spread unevenly in the oven and will give you cleaner, more defined edges on your finished cookies.
- Preheat and prepare:
- Set your oven to 350°F (175°C) and line your baking sheets with parchment paper so your cookies don't stick and brown unevenly on the bottom. This is also a good time to make sure your cooling rack is clear and ready.
- Roll and cut:
- On a lightly floured surface, roll one disc of dough to about ¼-inch thickness, working quickly so the dough doesn't warm up too much and become sticky. Cut out your shapes with heart-shaped cutters or whatever shape makes you happy, and place them 2 inches apart on your prepared baking sheets.
- Bake until just golden:
- Bake for 8 to 10 minutes, watching carefully so you catch them the moment the edges start turning golden but the centers still look slightly underbaked. They'll continue cooking on the hot baking sheet after you remove them, and this residual heat finishes the job while keeping the centers tender.
- Cool completely:
- Transfer your cookies to a wire rack and let them cool all the way down before you even think about decorating them. If you try to ice warm cookies, the icing will melt and look dull instead of glossy.
- Make your royal icing:
- In a large bowl, beat the egg whites (or meringue powder mixed with water) and lemon juice until frothy, then gradually add the sifted powdered sugar and vanilla while beating on low speed until smooth and glossy. The mixture should look like thick paint, not soupy or stiff.
- Tint and adjust:
- Add gel food coloring a little at a time until you reach the shade you want, then adjust the consistency by adding a few drops of water if you're flooding sections (for a smooth, poured look) or a bit more powdered sugar if you're piping outlines. The right consistency is the difference between icing that flows beautifully and icing that cracks or refuses to cooperate.
- Decorate with intention:
- Pipe or spread your royal icing onto the cooled cookies, letting your instincts guide you—straight lines, swirls, or intentional splashes all look stunning. Let the icing set completely (which can take several hours or overnight) before stacking or storing your cookies.
 Save
Save One morning after I'd made these for a Valentine's Day party, my son bit into one and said it tasted like something his grandmother would make, even though she'd never made strawberry cookies in her life. That comment reminded me that some flavors carry meaning beyond their actual taste, and these cookies somehow landed in that territory. They became less about impressing people with technique and more about creating something gentle and intentional to share.
Why These Cookies Feel Special
There's something about the combination of freeze-dried strawberries and royal icing that makes these feel more elegant than they actually are to make. The strawberries dissolve into the dough almost invisibly, tinting it this natural soft pink while giving it a subtle flavor that surprises people—they're never quite sure what makes them taste different until you tell them. And the royal icing dries to this beautiful hard candy shell that protects the tender cookie underneath while looking absolutely stunning.
The Secret to Not Overbaking
I learned this the hard way after pulling out a batch that looked done but turned out dry and slightly bitter around the edges. Now I set a timer for 8 minutes and start checking at that point, looking specifically at the edges rather than the center—if the edges are turning golden but the centers still look slightly pale, pull them out immediately. The cookies continue to bake on the hot sheet for another minute or two after you remove them, and this residual heat is what takes them from underbaked to perfect.
Decorating With Confidence
The beauty of royal icing is that imperfection looks intentional if you commit to it with enough confidence. I used to worry about my lines being wobbly or my colors not being perfectly even, until I realized that hand-decorated cookies are actually more charming than machine-perfect ones. The icing should be smooth and glossy when it's wet, and it will harden to a beautiful finish as long as you let it set completely before you touch it.
- Add gel food coloring gradually, one tiny drop at a time, because gel colors are intense and it's much easier to make it darker than lighter.
- If your icing becomes too thick while you're working, add a single drop of water and beat it in gently rather than dumping in water and starting over.
- Meringue powder royal icing is food-safe and works exactly the same as egg white icing once you get the consistency right, so don't hesitate to use it.
 Save
Save These cookies are a reminder that the best things to give are the ones made with your own hands, imperfections and all. They taste like strawberries and vanilla and a little bit of love, which is really all Valentine's Day desserts need to be.