 Save
Save My daughter came home from school buzzing about an Easter party, and suddenly I was hunting through Pinterest at midnight for something that looked impressive but wouldn't require me to become a pastry chef overnight. These mini bunny cakes caught my eye—they're goofy, manageable, and something a four-year-old could actually help decorate without creating a total kitchen disaster. Watching her pipe buttercream onto these little cakes and giggle while arranging candy eyes felt like the whole point of baking, honestly.
I made these for the first time on a rainy Saturday when three neighborhood kids showed up at my door asking if we were doing Easter activities. Instead of panicking, I pulled out ingredients and we spent the afternoon frosting and decorating, and something magical happened—the kids were so proud of their creations that they barely wanted to eat them. One of them asked if they could take theirs home and show their mom before eating it, and that's when I knew this recipe was a keeper.
Ingredients
- All-purpose flour (1 1/2 cups): This is your cake's foundation, so make sure it's fresh and not packed down in the measuring cup—spoon and level it for the best crumb.
- Granulated sugar (1 cup): The sweetness has to come through in a delicate crumb, so don't skimp or substitute brown sugar here.
- Unsalted butter (1/2 cup for cake): Room temperature is non-negotiable; cold butter won't cream properly and you'll end up with a dense cake.
- Whole milk (1/2 cup): Adds richness and keeps these mini cakes incredibly moist even days later.
- Large eggs (2): Bring them to room temperature so they incorporate smoothly and create lift in the batter.
- Baking powder (1 1/2 tsp): This gives you that tender, pillowy crumb that makes people ask for your recipe.
- Salt (1/4 tsp) and vanilla extract (1 tsp): Salt brightens the vanilla flavor, making it sing instead of just sitting there.
- Unsalted butter (1/2 cup for buttercream): Again, room temperature—this is your frosting's texture foundation.
- Powdered sugar (2 cups, sifted): Sifting prevents lumps that will show up when you frost, ruining the smooth finish you're after.
- Whole milk (2 tbsp) and vanilla extract (1 tsp): These loosen the buttercream to a spreadable consistency without making it greasy.
- Food coloring (optional): A tiny drop goes a long way; I learned this the hard way with neon green frosting that looked like something from a horror movie.
- Mini marshmallows: Cut them in half lengthwise with slightly damp scissors so they don't stick to your blade.
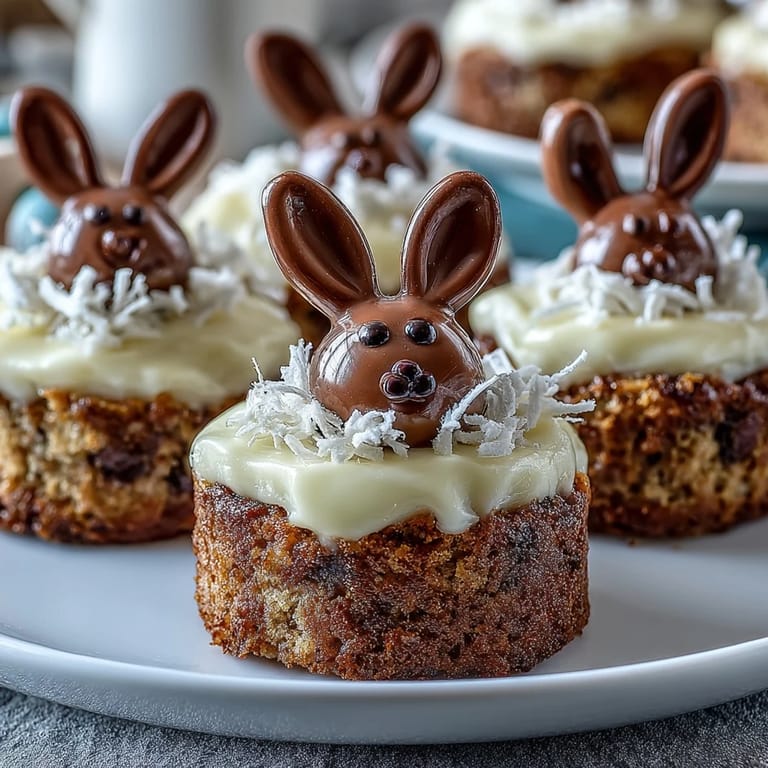
- Pink candy-coated chocolates: These become adorable bunny noses and honestly make the whole cake look intentional.
- Mini chocolate chips: Perfect bunny eyes that won't slide around if you place them in tiny buttercream dots.
- Shredded coconut or green sprinkles: The grass under each bunny makes them look like they're sitting in a little pasture.
Tired of Takeout? 🥡
Get 10 meals you can make faster than delivery arrives. Seriously.
One email. No spam. Unsubscribe anytime.
Instructions
- Set up and preheat:
- Get your oven going at 350°F and prepare that muffin tin—grease it well or use paper liners because these little guys stick if you're not careful. Having everything ready means you won't be scrambling mid-bake.
- Cream the butter and sugar:
- Beat them together for about 2-3 minutes until it looks pale and fluffy, like whipped clouds. This incorporates air into the batter, which is what gives you that tender crumb.
- Add eggs and vanilla:
- Drop in each egg one at a time and mix well before adding the next one, then stir in your vanilla. Each egg needs a moment to fully incorporate or you'll end up with a curdled-looking mixture.
- Mix dry ingredients separately:
- Whisk together flour, baking powder, and salt in another bowl to distribute the leavening evenly. This prevents dense pockets in your finished cakes.
- Combine wet and dry alternately:
- Add half the flour mixture, then half the milk, then repeat with the rest—this technique keeps the batter smooth and prevents overmixing. Stir just until you can't see any white flour streaks.
- Fill and bake:
- Divide batter so each muffin cup is about two-thirds full, leaving room for the cakes to rise without overflowing. Bake for 18-20 minutes until a toothpick comes out clean and the tops are just starting to turn golden.
- Cool completely:
- Let them sit in the pan for 5 minutes, then turn them out onto a cooling rack. Trying to frost warm cakes is a losing battle—the frosting will melt and slide everywhere.
- Make the buttercream:
- Beat softened butter until it's creamy, then gradually add powdered sugar so it doesn't poof everywhere. Once it's combined, add milk and vanilla a bit at a time, beating until it's fluffy enough to pipe.
- Tint if desired:
- Divide the buttercream into bowls and add one tiny drop of food coloring at a time, stirring well. I always start with less color because you can always add more, but you can't take it out.
- Frost the cooled cakes:
- Pipe or spread a generous dollop of buttercream on top of each cake. This is where the cakes really start looking like something special.
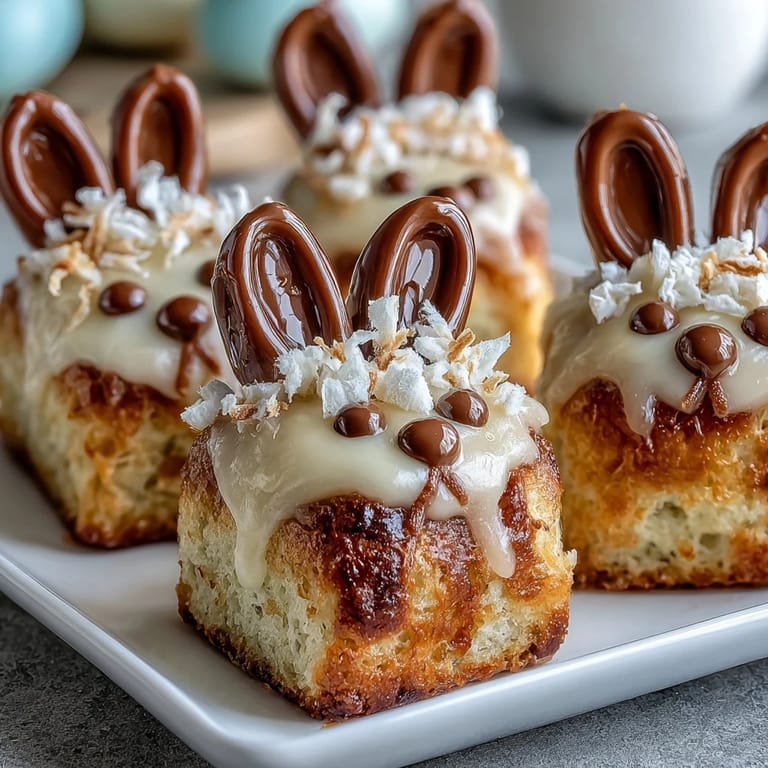
- Decorate into bunny faces:
- Cut marshmallows in half for ears and place them at the top, add pink candies for noses, and press mini chocolate chips in for eyes. Sprinkle coconut or green sprinkles around the base to look like grass.
- Final presentation:
- Arrange them on a platter with extra coconut or sprinkles scattered around for a festive Easter scene. Step back and admire your bunny army before they disappear.
 Save
Save There's something about watching a child's face light up when they realize they made something cute and delicious that stays with you. One of the neighborhood kids took her bunny cake home and told her mom it was the most beautiful dessert she'd ever seen, and that moment reminded me why I love baking—it's not about perfection, it's about creating something that makes people feel special.
Make-Ahead Magic
The best part about these cakes is that they're actually better when you're not stressed about timing. Bake them the day before, wrap them in plastic wrap, and store them at room temperature—they'll stay moist and actually taste better as the flavors settle. I usually frost and decorate them the morning of the party so the buttercream is fresh and the candy decorations stick properly, but honestly, even that can happen the night before if your kitchen is cool enough.
Decorating Without Stress
The beauty of bunny cakes is that every bunny looks slightly different, and that's exactly what makes them charming instead of looking factory-made. You don't need fancy piping skills or steady hands—if a candy falls off, it's part of the charm. I've made these with kids as young as three and as old as twelve, and they all turned out adorable because there's genuinely no wrong way to arrange a bunny face.
Flavor Twists and Variations
While vanilla is the classic choice that lets the buttercream and decorations shine, these cakes are incredibly forgiving if you want to play around. I've made chocolate versions for kids who wouldn't touch vanilla, and I've added almond extract instead of vanilla for a subtle twist that made adults actually request the recipe. The buttercream can be tinted any color—pastel pink, soft yellow, or pale green—to match your Easter theme, and honestly, the color matters more than you'd think when it comes to making these feel festive.
- Try adding a quarter teaspoon of almond extract along with vanilla for an elegant flavor depth.
- Substitute chocolate for the vanilla in both cake and frosting if your crowd skews chocolate-loving.
- Make mini bunny faces in advance and freeze them for up to two weeks if you're planning ahead.
 Save
Save These little bunny cakes have become my go-to Easter contribution, and honestly, they might be one of the first things I make when spring rolls around. There's something joyful about a dessert that's meant to be silly and fun, and these deliver on that promise every single time.
Common Recipe Questions
- → What type of flour is used in these cakes?
All-purpose flour provides the ideal texture and structure for the moist vanilla sponge.
- → How do I make the buttercream fluffy?
Beat softened butter until creamy before gradually adding powdered sugar and milk, then whip until light and airy.
- → How can the decorations be customized?
You can use mini marshmallows, candy-coated chocolates, mini chocolate chips, shredded coconut, and food coloring to create bunny features and grass effects.
- → Can dietary needs be accommodated?
Substitute dairy-free butter and milk to make these suitable for dairy-sensitive individuals.
- → What is the best way to store these cakes?
Keep the cakes refrigerated in an airtight container to maintain freshness and prevent the frosting from melting.
- → Is it possible to swap vanilla for another flavor?
Yes, chocolate or other flavor extracts can be used to alter the sponge for variety.