 Save
Save My daughter came home from school with a drawing of an Easter bunny sitting in a garden, and she asked if we could make something that looked just like it. I stood in the kitchen that afternoon, looking at the ingredients scattered across the counter, and realized we could actually build edible gardens in cups. These dirt cups became our tradition—simple enough that she could help layer them, magical enough that her friends always asked for the recipe.
I made these for a school potluck once, and watching children's faces light up when they realized the chocolate dirt was actually Oreos was worth every moment of prep. One kid whispered to his mom that he thought the marshmallow bunnies were hiding in real gardens underground, and honestly, that made my whole week.
Ingredients
- Instant chocolate pudding mix: One box (3.4 oz) is your foundation—it sets quickly and tastes rich without the fuss of homemade, though you can make your own if you want that deeper chocolate flavor.
- Cold whole milk: Two cups activates the pudding perfectly; cold is key here because it helps everything thicken properly in just two minutes.
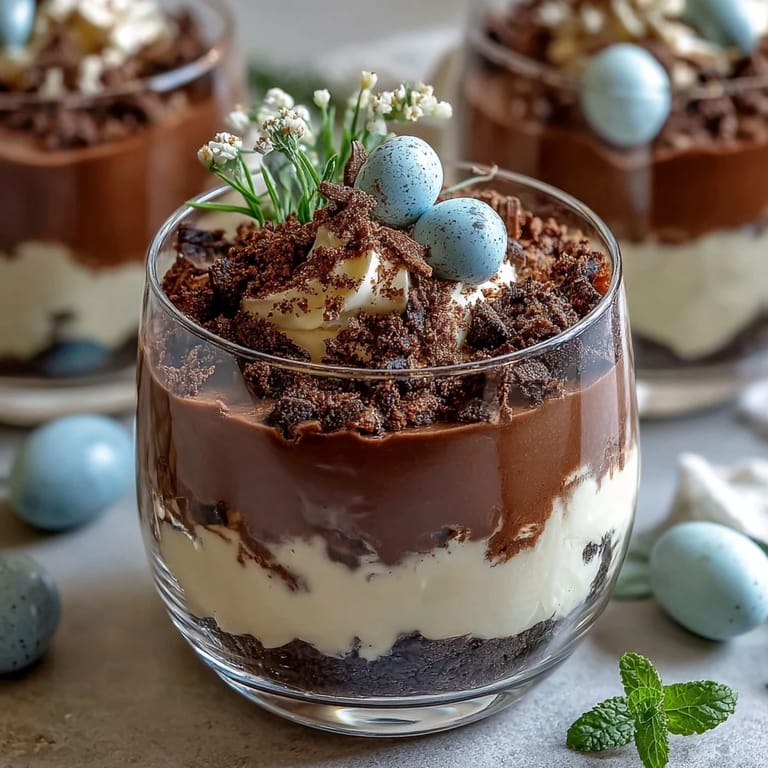
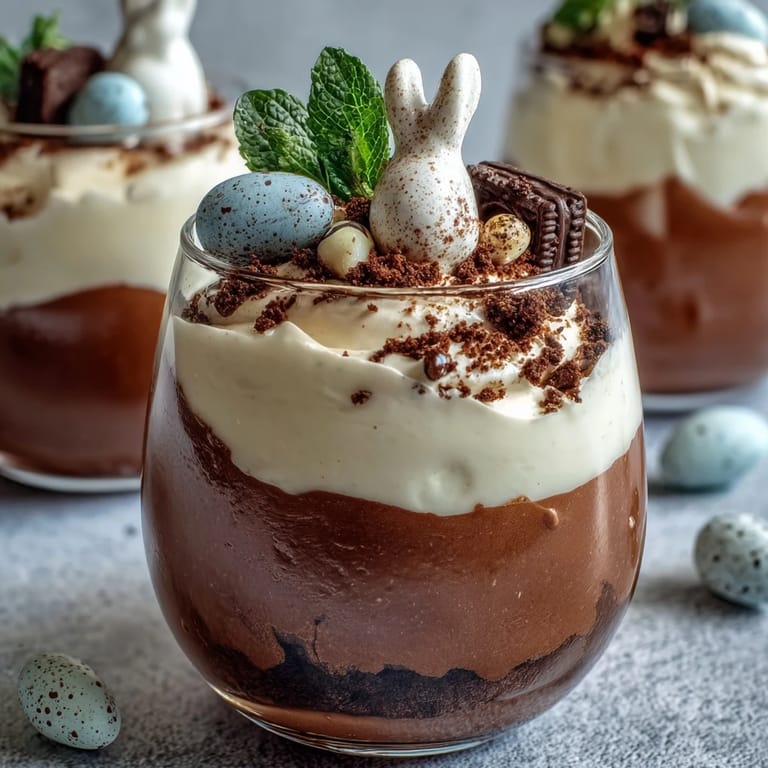
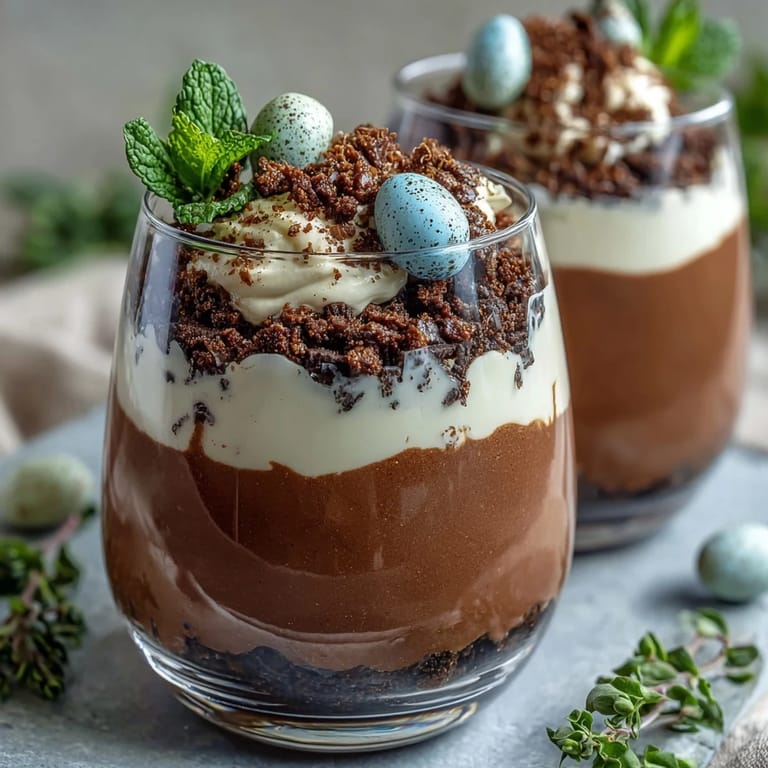
- Oreo cookies: Eighteen regular or golden cookies get crushed until they resemble actual soil, which is the whole visual magic of this dessert.
- Whipped topping: One cup (Cool Whip works beautifully, or whip heavy cream yourself for a homemade touch) creates the clouds nestled in your chocolate soil.
- Marshmallow bunny candies or chocolate bunnies: Six to twelve pieces depending on how crowded you want your garden scene to feel.
- Pastel-colored sprinkles: A quarter cup scattered across adds that spring garden feeling and pops of color.
- Mini candy eggs: One-third cup optional, but they're the detail that makes kids smile.
- Fresh mint sprigs: Six small pieces optional, but they genuinely look like grass sprouting from the dirt.
Tired of Takeout? 🥡
Get 10 meals you can make faster than delivery arrives. Seriously.
One email. No spam. Unsubscribe anytime.
Instructions
- Mix your pudding base:
- Whisk the instant pudding mix and cold milk together in a medium bowl for exactly two minutes—you'll feel it thicken under your whisk, which is surprisingly satisfying. Let it sit for five more minutes so it sets completely and becomes smooth.
- Crush the cookies into dirt:
- Food processor works fastest, but honestly, sealing Oreos in a zip-top bag and letting someone (cough, your kid) crush them with a rolling pin is half the fun. You want pieces that look like garden soil, not fine crumbs.
- Layer your first soil base:
- Spoon two tablespoons of crushed Oreos into the bottom of each of your six clear cups—this is where the layering magic starts. The clear cups are important because the visual contrast between dark soil and light pudding is part of the appeal.
- Add the chocolate pudding:
- Divide the pudding evenly among all six cups, pouring it gently over the cookie base. You'll see the layers start to look intentional and almost artistic.
- Create the dirt top layer:
- Sprinkle another two tablespoons of crushed Oreos over each pudding layer to complete the soil effect. This is what makes everyone do a double-take when they first see the cup.
- Crown with whipped topping:
- Spoon or pipe a generous dollop of whipped topping into the center of each cup—this becomes the sky or clouds above your garden. It also adds a textural contrast that makes each spoonful interesting.
- Decorate your Easter garden:
- This is where you let personality shine—nestle marshmallow bunnies into the whipped topping, scatter sprinkles, add mini eggs, and tuck mint sprigs around the edges. Think of it as planting a tiny edible garden.
- Serve or store:
- These are best served right away while the contrast between temperatures and textures is most pronounced, though you can refrigerate them until just before serving.
 Save
Save My son once brought the leftover dirt cups to show-and-tell and convinced his entire class that desserts could be art projects. That's when I understood these weren't just about Easter or bunny decorations—they were about transforming something ordinary into something that made people pause and smile.
Why Clear Cups Make All the Difference
The whole reason these work visually is because you can see every layer through transparent glass or plastic. When someone looks at the cup before eating, they see the dark Oreo foundation, the rich chocolate middle, and the white whipped cloud on top—it tells a complete story. I once tried making these in opaque bowls because I ran out of clear cups, and nobody was nearly as excited, which taught me that presentation matters even for simple desserts.
Making It Your Own
The beauty of this recipe is how customizable it becomes. You can swap the marshmallow bunnies for chocolate ones, use different sprinkle colors to match your party theme, or add crushed graham crackers to the soil mix for extra texture. I've seen versions with peppermint-flavored pudding, cookies-and-cream layers, and even gummy worms burrowed through the dirt for extra whimsy.
Storage and Make-Ahead Tips
You can assemble these up to twenty-four hours ahead, though the Oreos will gradually absorb moisture and soften slightly, which some people prefer. I always add the whipped topping and decorations right before serving so everything stays crisp and the mint stays vibrant. If you're bringing these to an event, transport them in a sturdy container and don't seal the lid too tightly so condensation doesn't accumulate.
- Make the pudding and crush the cookies the night before if you're short on morning time.
- Add whipped topping and decorations just before serving for the best texture and appearance.
- Refrigerate assembled cups but serve them within twenty-four hours for optimal enjoyment.
 Save
Save These cups remind me that the best desserts aren't complicated—they're the ones that spark joy and bring people together. Every time I make them, someone new discovers they're actually Oreos and not real dirt, and that moment never gets old.
Common Recipe Questions
- → How do I achieve the layered dirt effect?
Crush the Oreos finely and layer them before and after the pudding to mimic soil. This creates a textured 'dirt' appearance.
- → Can I use homemade pudding for this dessert?
Yes, homemade chocolate pudding works wonderfully and adds a fresh, creamy flavor to the dessert.
- → What are good alternatives for bunny decorations?
Marshmallow or chocolate bunny candies work well, and you can also use gummy worms or mini candy eggs for extra fun.
- → How long can these cups be stored before serving?
For best texture and flavor, serve within 24 hours. Keep refrigerated until ready to serve.
- → Can these cups be made gluten-free?
Yes, use gluten-free sandwich cookies in place of Oreos to accommodate gluten sensitivities.