 Save
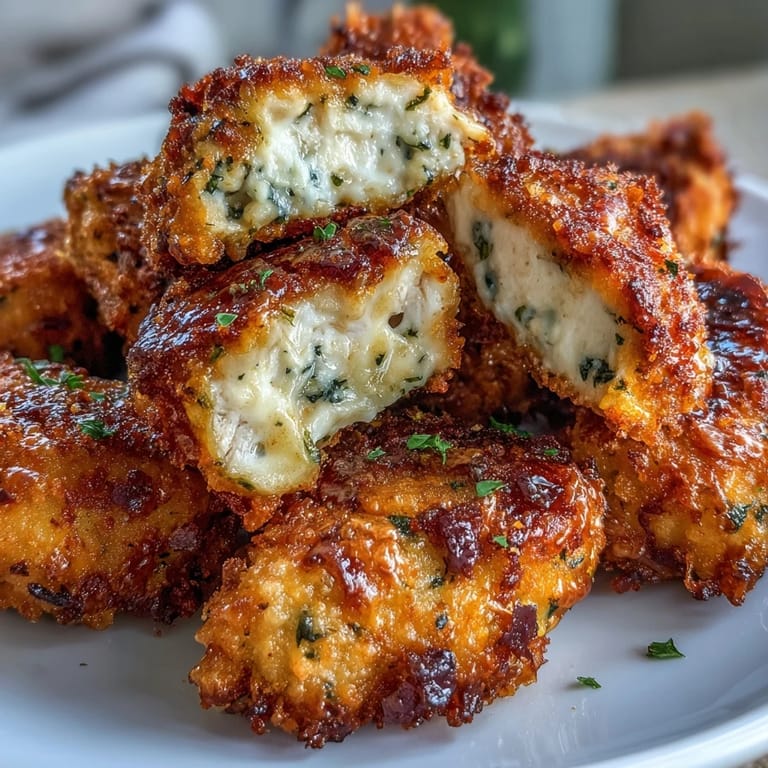
Save My kitchen smelled like a Italian delicatessen the afternoon my neighbor stopped by with a wedge of aged Asiago she'd bought at the farmer's market. We were standing there, both of us a bit restless on a lazy Saturday, when she suggested we do something with it beyond just snacking straight from the block. I pulled out chicken breasts, panko, eggs, and within twenty minutes we had golden, crispy bites cooling on the counter that tasted like we'd somehow bottled up that salty, nutty cheese flavor into something you could actually hold in your hand.
I made these for a potluck once and brought them in a small wooden box lined with parchment, alongside a tiny jar of garlic aioli tucked in the corner. People picked at them slowly at first, then started grabbing handfuls, and by the end someone asked if I was taking requests for the next gathering. That's when I realized this wasn't just a snack—it became the thing people actually remembered from the meal.
Ingredients
- Boneless, skinless chicken breasts or thighs (500 g / 1 lb), cut into 1-inch pieces: Thighs stay juicier, but breasts work fine if you don't overchew them during cooking.
- Salt (1/2 tsp) and black pepper (1/4 tsp): This simple seasoning keeps the chicken from tasting bland before the Asiago takes over.
- Panko breadcrumbs (100 g / 1 cup): They're coarser than regular breadcrumbs, which is why these bites get that satisfying crunch instead of a dense crust.
- Finely grated Asiago cheese (60 g / 2/3 cup): Grate it yourself if you can—pre-shredded stuff sometimes has anti-caking agents that prevent it from browning as beautifully.
- Dried Italian herbs (1 tsp, optional) and garlic powder (1/2 tsp): These are your backup singers, quietly making the cheese shine without stealing the spotlight.
- Large eggs (2) and milk (2 tbsp): The milk thins the eggs slightly so they coat more evenly, and everything sticks together like you meant it to.
- Olive oil or melted butter (2 tbsp) for drizzling: This is non-negotiable if you want that restaurant-quality golden finish on the outside.
Tired of Takeout? 🥡
Get 10 meals you can make faster than delivery arrives. Seriously.
One email. No spam. Unsubscribe anytime.
Instructions
- Get your oven ready and prep your workspace:
- Heat the oven to 220°C (425°F) and line a baking sheet with parchment paper so cleanup is painless later. Having everything laid out before you start means you won't be standing there with wet, breaded fingers looking for a bowl.
- Season your chicken pieces:
- Scatter the cut chicken onto a plate and sprinkle salt and pepper over everything, tossing gently to coat evenly. This simple step is easy to skip, but it makes a real difference in flavor.
- Set up your breading station:
- Pour the egg and milk mixture into one shallow bowl, and in another bowl mix the panko, Asiago, herbs, and garlic powder together with a fork until it looks like coarse sand.
- Coat each piece carefully:
- Pick up a chicken piece, dunk it in the egg mixture until it's wet all over, then drop it into the panko-Asiago mixture and press gently with your fingers so the coating sticks. This is a little meditative—almost therapeutic if you're not rushing.
- Arrange on the baking sheet:
- Place each coated bite on the prepared sheet in a single layer without crowding them together too much. Space matters because air needs to circulate underneath for even crisping.
- Add the finishing touch:
- Drizzle or lightly spray the chicken bites with olive oil or melted butter, which is what transforms them from pale and sad to golden and irresistible. Don't skip this step thinking it defeats the purpose—the oil is essential for that crispy exterior you're after.
- Bake until golden and cooked through:
- Place the baking sheet in the oven and set a timer for about 13 to 15 minutes, turning the pieces once halfway through so they brown evenly on both sides. They should reach an internal temperature of 74°C (165°F) when checked with a meat thermometer.
- Optional broil for extra crispiness:
- If you want them even crunchier, flip the oven to broil for the last 1 to 2 minutes, but watch them closely so they don't burn. This step takes them from good to genuinely craveable.
 Save
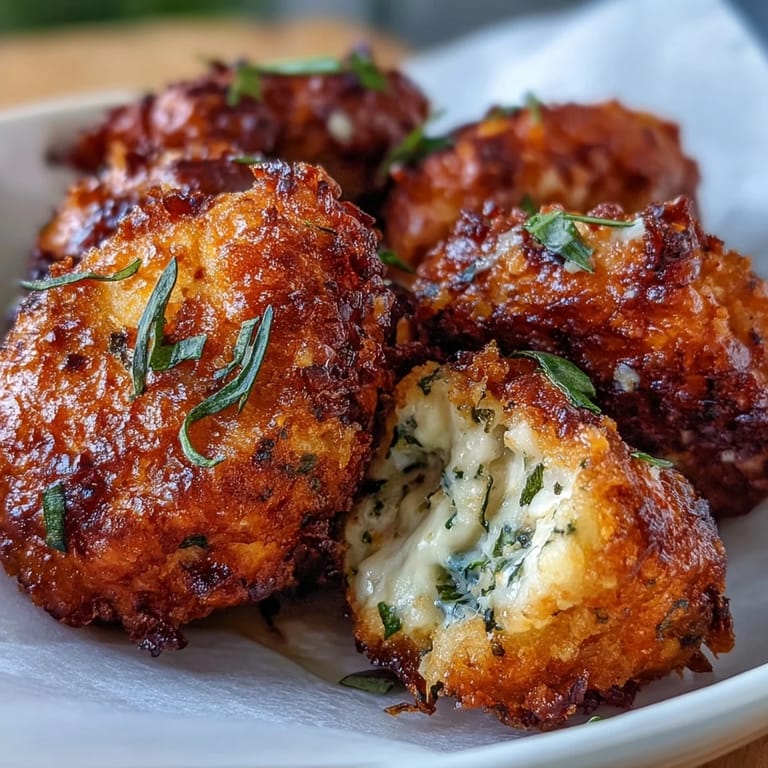
Save There's something deeply satisfying about opening the oven and seeing them puffed up and golden, the smell of toasted cheese and garlic filling the kitchen. It feels like accomplishment in bite-sized form.
Serving Ideas That Actually Work
These are brilliant scattered over a simple arugula salad where their warmth wilts the greens just slightly and the Asiago flavor echoes through the whole bowl. They also fit perfectly into wraps or pita pockets if you're going for something more portable, or honestly, they're just as good served plain with nothing but a small fork and a napkin on your lap while you're doing literally anything else.
Dipping Sauces That Pair Perfectly
Marinara is traditional and reliable, but ranch dressing (if you lean that way) somehow makes them taste even more snackable. Honey mustard adds a sweet-tangy note that surprises people, and a proper garlic aioli is what you make when you want to feel fancy on a Tuesday afternoon.
Variations and Storage
You can absolutely swap the Asiago for Parmesan or Pecorino if that's what you have on hand—both will give you that same salty, umami depth. For a gluten-free version, use certified gluten-free panko and check all your ingredient labels for sneaky cross-contamination since that matters. These keep beautifully in an airtight container in the fridge for up to three days, and you can reheat them in a 180°C (350°F) oven for about five minutes to bring back the crispness, or even eat them cold straight from the fridge if you're in a hurry.
- Make a double batch and freeze the uncooked, breaded pieces on a tray before baking them later—they'll cook just fine straight from frozen, maybe add 2 or 3 extra minutes.
- If your panko isn't browning enough, you might be using too much oil; a light drizzle is better than a soak.
- Taste a piece early to check seasoning since everyone's palate is different—you can always dip in a flavored sauce if you want more intensity.
 Save
Save These Asiago panko chicken bites have become one of those recipes I make on autopilot now, the one that always disappears first and somehow feels both effortless and impressive. Once you've made them once, you'll understand why.
Common Recipe Questions
- → What makes the coating extra crispy?
Panko breadcrumbs create a lighter, crunchier texture than regular breadcrumbs. The olive oil drizzle before baking helps the coating golden evenly, while the high oven temperature ensures the exterior crisps before the chicken dries out.
- → Can I fry these instead of baking?
Absolutely. Heat oil to 350°F and fry for 3-4 minutes until golden brown and cooked through. Drain on a wire rack or paper towels to remove excess oil.
- → What's the internal temperature for doneness?
Chicken should reach 74°C (165°F) when measured with a meat thermometer inserted into the thickest piece. Cut into one piece to verify the meat is opaque throughout if you don't have a thermometer.
- → How do I store leftovers?
Refrigerate in an airtight container for up to 3 days. Reheat in a 375°F oven for 8-10 minutes to restore crispiness—microwaving will make them soggy. Freeze uncooked, coated pieces on a baking sheet, then transfer to bags for up to 2 months.
- → What dipping sauces work best?
Marinara adds tangy brightness, while ranch or blue cheese provides cooling contrast. Honey mustard balances the savory cheese, and garlic aioli complements the Italian herbs. Try spicy sriracha mayo for heat.
- → Can I use chicken thighs instead of breasts?
Thighs stay juicier due to higher fat content and are more forgiving if slightly overcooked. Cut them into similar 1-inch pieces and adjust baking time by 1-2 minutes if needed.